Category Archives: Tutorials

Filtercam Funhouse

As part of our exhibit at SL9B I wanted to showcase all the things you can do with an image without photoshop.  There seems to be an ongoing idea that all bloggers require photoshop to be able to blog worth a damn.

Well, I’ve never owned photoshop and I thought I’d show you one of the tools you can use to make your photos more interesting, festive or tell a story – without having PS.

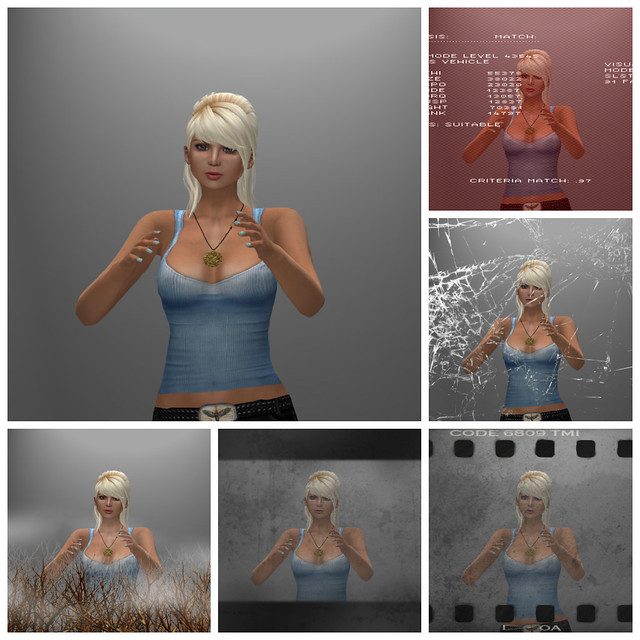
The picture above is me, in neutral lighting with my arms up – see the largest picture. It’s kind of a random pose, and that’s why I chose it. But if I employ a photo-hud, in this instance FILTERCAM I can convey a different mood by choosing different filters over my avatar.

I can make her look like she is escaping or celebrating, just by changing the mood with a filter.

This is a very small sampling of the available changes I can make to one posed avatar’s picture using Filtercam from Mechanized Life.

I have done a couple of tutorials on the details and step by step of how to use Filtercam HERE  and HERE . I think it’s one of the simplest to use and most fun tools bloggers and photographers of Second Life have to make their photos shot in world interesting without having to own PS.

You can tell a story with your pictures, without post processing at all.

Filtercam is available on Marketplace along with an extra pack of more filters for those of you who can’t get enough.

Alternatives to PhotoShop

Photoshop is wonderful software and I have loved it for many years. I just recycled by floppies from the early version I bought for my MacSE when I moved last year. I really didn’t need them to prove anything to upgrade any longer since there’s no place to insert floppies any more. Upgrading from version to version, the price of the software does not slap you in the face like it does if you are buying it for the first time. For the kind of editing I do for my blog, there’s just no justification for spending that kind of money – particularly when there are so many alternatives that are free.

Applications you download

  • GIMP. GIMP is the granddaddy of the free alternatives. It’s open-source and the word GIMP stands for SNU Image Manipulation Program, it’s very name signaling its open-source street cred. It’s available for Windows, Linux and Mac. It has tons of bells and whistles and there are users who swear it’s even better than Photoshop. If you tried GIMP a few years back, its user-face is easier and more user-friendly than it used to be.
  • GimpPhoto: Based on GIMP with a more PhotoShop like user interface. For Windows and Linux.
  • Photoscape: This is a Windows only program. Sasy Scarborough at Sasypants.com swears by it and has done a great tutorial on using it, including a movie.
  • Paint.NET is another Windows only program. It was supposed to just be a replacement for MS Paint, but it’s grown beyond that old program into a decent photo editing application.
  • ChocoFlop: This is a Mac only program that takes advantage of Mac’s architecture to allow fast, non-destructive photo-editing. It’s no longer being updated and developed, but is still available and totally free.
  • Pixelmator: A super cheap ($14.99) alternative to PhotoShop for Macs only. Seriously, for $14.99 you get content-aware fill. What more can you ask for?
  • CinePaint: Actually it’s designed for making animated films, but has great image-editing capabilities and it’s free. Mac software.
  • Pixia and Phierha: For Windows users. Created to make anime/manga illustrations, it’s a powerful image editor. Phierha is an newer version of Pixia with more features and a redesigned interface.
  • Inkscape: Inkscape is more accurately an alternative to Illustrator, but has a lot of good tools for editing. For Linus, Windows and Mac.
  • PhotoPlus: has standard image editing tools plus drawing brushes. Windows only.
  • Mac Preview: Preview is not just for peeking at your photos before deciding which to keep and which to toss. You can crop, edit, add text and do manage basic photo-editing tasks with the free app that comes already loaded with your Mac.
  • PhotoFiltre: Windows only. If you want maximum flexibility to add lots of filters, this image-editing program is very focused on allowing you to add filters. There are more than 100 filters with this program.
  • ToyCamera AnalogColor: Even people with PhotoShop will want this little app though it’s not free. (¥1,050 or $13.35.) It’s super easy, full of effects and they work so fast that you can lose yourself in trying them out. For Mac and PC.

ToyCamera AnalogColor is well-named because it’s so much fun to play with it.


Web-based Editors

  • PicMonkey: Gidge and Gogo love this one.  It has an easy collage-making interface and tons of special effects you can use on your photos. PicMonkey is so free you don’t even have to give them your email address. No registration required!
  • Splashup: Integrates seamlessly with Picasa, Flickr, Facebook, Photobucket, SmugMug and their own photo-hosting at SplashUp. Lets you edit several photos at once and feels like an application.
  • Photoshop Express: Yes, an alternative to Photoshop is Photoshop! This is a web-based version of Photoshop with some useful tools like dodge and burn and fun effects like color pop that lets you make a black and white picture with one pop of color.
  • G-Plus Creative Kit: If you have G-Plus and upload your photos there, you can edit them using their creative kit. It’s super-easy and there are lots of fun effects and basic editing options. Making a duotone has never been easier.
  • Aviary – the new photo editor that directly links to Flickr. Works on your mobile phone and with Facebook. Very easy to use.
  • FotoFlexer: In addition to lots of retouching tools, effects and other basic tools, this lets you work with layers, curves and liquify. It also integrates with most common photo-hosting sites.
  • LunaPic: If you are in love with effects, this might be your favorite. Works with Facebook, Picasa, Flickr and Photobucket.
  • Photo-kako.com: The interface is a little confusing,  probably due to non-native English speakers doing the translation. However, there are so many toys to play with in adding fancy effects and filters to your photos, you won’t mind experimenting.
  • Pixlr.com: Super easy with fun effects that you can run through one after another. It’s also entertaining to use the Pixlr-Matic retro effects. The work window looks like a developer tray and when you move your cursor the developing fluid ripples under the cursor. Who knew editing could be such fun!
  • Big Huge Labs: Helping you do cool stuff with your digital photos since 2005. Make your own movie poster or magazine cover. Try out fun effects. It’s a great place to play.

Splashup integrates seamlessly with many photo hosting sites.

This and other tutorials are all featured at the Blogger Carnival at SL9B. With tutorials from eight bloggers, the Blogger Carnival will have lots of tips and in-world sets for your to practice your new skills. It opens Monday, June 18th.  Blogger Carnival at SL9B

Updated to add Pixlr.com and Big Huge Labs.

Mirror, Mirror on the Floor: A Tutorial

SL9B

What with Snow White, Snow White and Snow White, it’s about time we had some mirrors in Second Life. It seemed a logical next step after the reflections in the previous tutorial, though I was more in the market for a homey little mirror rather than some grand baroque masterpiece with a talking head. Though, that makes me wonder if there were a talking head on a prim just under the water…

Continue reading

Reflections of You: Tutorial

Way back in January, I saw a fantastic tutorial by Graphic Dix for Modavia Fashion Marketing on using Second Life’s water in an innovative way to capture reflections. We’ve all stood on the bank of a river or waded into the ocean and admired our reflections, but he took it to a new level.

SL9B

I wanted to do something similar and experimented a little bit and ended up going in a slightly different and, perhaps, easier direction, though achieving the same effect.  I began by finding a texture, in this case some mossy pavers from Zooboing Creations. I made a copy of the texture and using a big soft-edge eraser, I erased part of it, leaving it open alpha areas.

Continue reading

Picking Your Pose – A Tutorial

It might seem intuitive that if you’re a blogger you know what you’re looking for in poses but I know as a new blogger, I certainly didn’t know.  So for part of our SL9B celebration, I’m offering up poses 101, what you’re looking for as a consumer.

I do make poses, and while I’ve been doing it almost two years I’m nowhere near a veteran. But for the sake of diplomacy, I’m only using poses I’ve made to demonstrate the good and the bad of static poses. Continue reading

Phototools Tutorial – Take Back Your Windlight Control

PHOTOTOOLS TUTORIAL PIC 1

There are very few things I have hated as much as I have loathed the changed to the windlight settings in the new UI. I deal with them, as do you, but basically, what a pain in the ass they made it.

On plurk the other day, my friend Isa linked to PHOTOTOOLS which is a Firestorm plug in that you can use to wrestle back control into one easy interface option and make your photoshoots so much simpler.

First of all, go to Phototools and DL the plug in.

Follow the instructions it gives you in the zip file. You will be replacing some of the files in your Firestorm skins folder. I made a copy and put them in a handy dandy folder. It’s very easy and took me about two minutes.

Now, restart Firestorm and hit the QUICKSTART button at bottom right. You now get a different menu.

You will see that your camera control options are a bit different now too. For your windlight settings you have rocker arrows as well as drop downs.

A quick tap of water and sky arrows gave me a completely different look. But there’s more. Continue reading

Tutorial – Editing Jewelry When You Cannot See It

may09b_013

I love Boom’s fabulous pastel ombre backless tees at Collabor88. The come in all shades of pastel and are as fresh as springtime. Before choosing this jewelry from Bliensen & Maitai, I tried on several other options, a couple of them falling so deep into my torso they were not even visible. This made me think it might be useful to share a few tricks for dealing with that dilemma.

There are a few options, some people try to cam inside the body and select the jewelry. I find that so frustrating because sometimes I can see the prim to select and SL will not let me select it because there’s another prim in the way. I used to go to edit mode and make my shape short, raise the necklace over my head and then restore my shape again. Not my favorite options. There are easier ways to do it.

Continue reading

Ground Offset, where have you been all my SLife?

Screen shot 2012-05-04 at 7.57.10 AM

In the picture above, you can see that my hands are in the globe. I can fix that in Exodus as easy as 1, 2, 3.

  1. Click on the quick preferences in the lower left
  2. Find the ground offset option
  3. Shift it up or down to shift position to the right spot.

Screen shot 2012-05-04 at 7.57.01 AM

And there you have it, hands out of the globe. By the way, this is even better at helping when your feet sink in some prim terrain or float above the stairs. Now let’s please see this in every viewer.

Chiaroscuro – a Lighting How-To

MiaMai Sweet

Reader and blogger Isabelli Anatine asked for a tutorial on how to get a chiaroscuro effect in Second Life photos and so here goes. First I started out the making myself a projector as I already explained how to do in an earlier tutorial Lighting, Shadows and Projectors, Oh My!.

Continue reading