Reader and blogger Isabelli Anatine asked for a tutorial on how to get a chiaroscuro effect in Second Life photos and so here goes. First I started out the making myself a projector as I already explained how to do in an earlier tutorial Lighting, Shadows and Projectors, Oh My!.
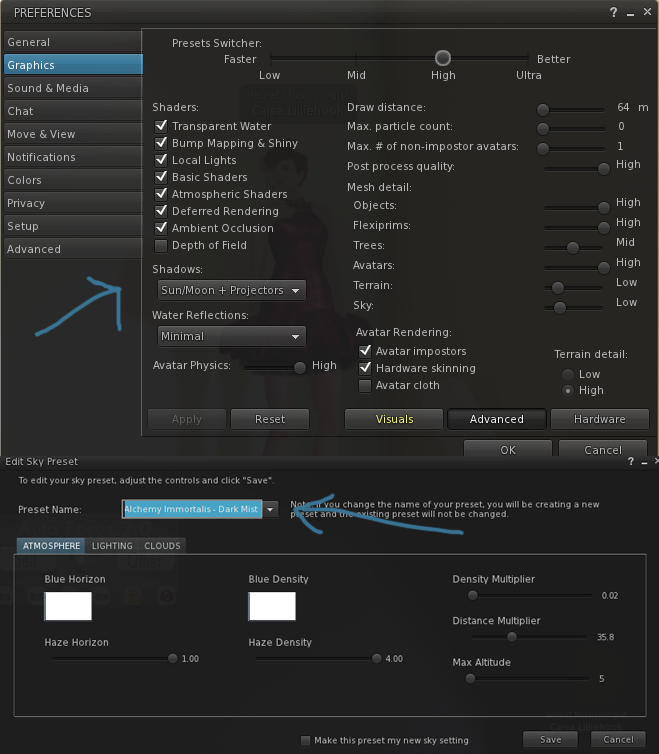
I turned on the lighting in Preferences/Graphics by selecting Sun, Moon and Projectors and changed the environment to a very dark setting. In this case, I used the Alchemy Immortalis Dark Misty Night setting because it’s a deeper, richer blackness than the default Midnight.
I rezzed the projector and moved and turned it and played around until I got it where I wanted it.
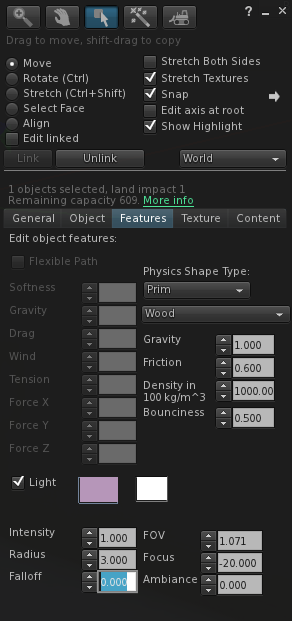
 Then I started fussing with the projector to get the settings right for each shot. The key settings are the ones at the bottom on the Features Tab under Light.
The first four, color, Intensity, Radius and Fall-Off are basic features of lights and function whether or not you have Lighting and Shadows enabled.
The three in the right hand column are specific to projectors and only function when Lighting and Shadows are enabled.
FOV is Field of View and is basically how wide an angle the light projects.
Focus is how blurry the projected light is around the edges. With a positive number, the edge is hard, with a negative number it’s blurry.
Ambiance diffused the light, softening the shadows.
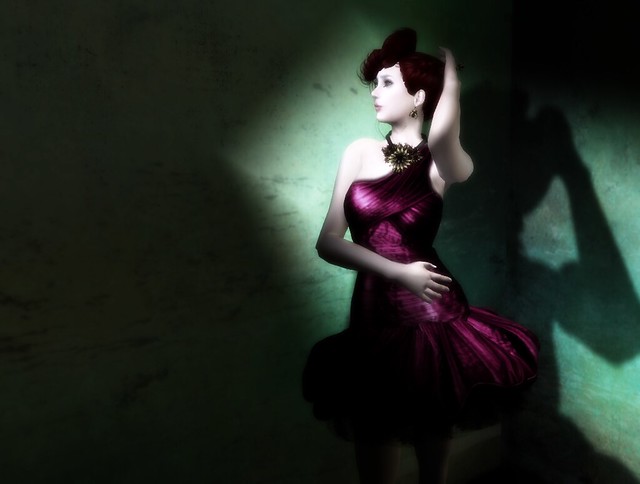
Here you can see the result from the photo above after I have zoomed in and framed it. The dress, by the way, is from MiaMai and is called Sweet – a great name for a sweet candy-colored confection like this.
In this one, you can see I have increased the ambient lighting so that the shadows on the face shift. I still need to change the color of the lighting to white (pale gray actually, pure white is too harsh) and shift and adjust until I get what I want.
I want to intensify the contrast, so I make a duplicate layer and set the layer blending option to Soft Light. There’s an excellent video tutorial from Elysium Elide on how this works. You should watch this video to see how to work with this. For this kind of picture, though I do want more darkness than she does.
As you can see, the photo is pretty much captured in Second Life, with just a simple duplicate layer used to intensify the light and shadow. It sure highlights the necklace from Kunglers.
Store info at Blogging Second Life
****SHOPPING LIST******
Poses: oOo Studio
Skin: PXL Creations Kate
Makeup Tattoos: PXL KAte Nat Passion Lips Glossy
Eyes: Poetic Colors
Lashes: Lelutka
Mani/Pedi: TGIS Bridal Nails
Hair: Boon QPT129
Clothing: MiaMai Sweet Red
Shoes: Baiastice Etienne Black


Thanks a lot Cajsa!
I will try to do this soon <3
Thank you for the helpful and clearly-illustrated tutorial! I’m a big fan of seeing cool light/shadow setups in SL and I hope this helps get Resis on the right track. Appreciate your knowledge.
Thanks so much! Isabelli, thanks for motivating me to do this post.
Torley, thank you for your enthusiasm for photography. I would know your voice in any crowd from watching many of your tutorials on how to do this that and the other. You guided me through noobhood, so your comment means a lot to me. Thanks so much.