For some reason the regular Second Life viewer decided that I could only log into the beta grids. I tried all sorts of things to convince it that I wanted to go elsewhere, but it ignored me and kept defaulting back to the beta grid. Eventually I manual deleted all my App Settings folders for Second Life, deleting the cache, preference, everything. Since I had to reset my preferences anyway, I thought I might give you a walk-through of how I set up my computer to shoot photos.
First I press CTL-OPT-D to open the Advanced Menu. I want to be able to cam all over with my camera so Deselect Limit Select Distance. This not only lets me edit things far away, but I can also option-click on them to bring them into the exact center of the picture. Then I Disable Camera Constraints so I can move my camera vision all over, far away or close up. I select High-Res Photos because it doubles the pixel count of the pictures you save. I also select Quiet Snapshots to Disc so that I don’t get the click sound and also so I don’t make a cheesy smile in every picture. I also enable the Show Development Menu for some things later one.
(Handy Tip #1: See that Rendering Types Menu. Remember that! If you are editing a prim and it runs away from you and gets buried in a mountain or if you move your pose stand and accidentally lower it into the ground you can go there and rescue your lost and buried items. Just deselect Surface Patch and the ground disappears and there your things are.) (Handy Tip #2: Also, if you’re shooting landscapes and want no people in them, just deselect render avatars, though lately that has sometimes derendered things that are not avatars. It seems to be a recent bug so let’s hope it gets fixed.)I like my camera view to be a bit more realistic, so I use Nalates Urriah’s guide to camera positioning. For more information about how this affects your experience and more technical understanding, check out her tutorial.
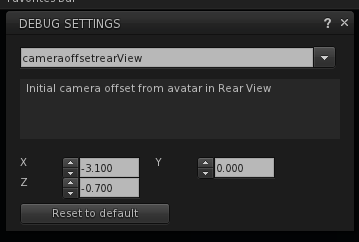

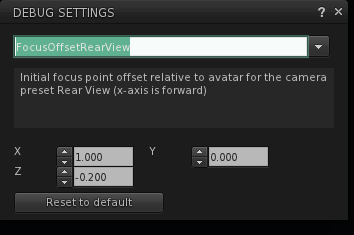
In the Advanced Menu, you select Open Debug Settings and type in CameraOffsetFrontView and change to X=3.1, y=0 and Z=-0.5. For the rear view, you go to CameraOffsetRearView and change to X=-3.1, y=0 and Z=-0.5. Note that it is minus because it’s behind the av. It makes sense to do the Camera Offset front and back before moving on to the Focus Offset.
The next step is updating the Focus Offset. In the Debug Window, type in FocusOffsetFrontView and change Z to 0.400. Do the same for FocusOffsetRearView.
There’s no reason you cannot play with this a bit to make yourself perfectly happy with your camera position so that’s it’s exactly how you want to look at Second Life. It does take some getting used to as it makes the world much more immediate. It’s also very liberating to not be looking at the ground all the time.
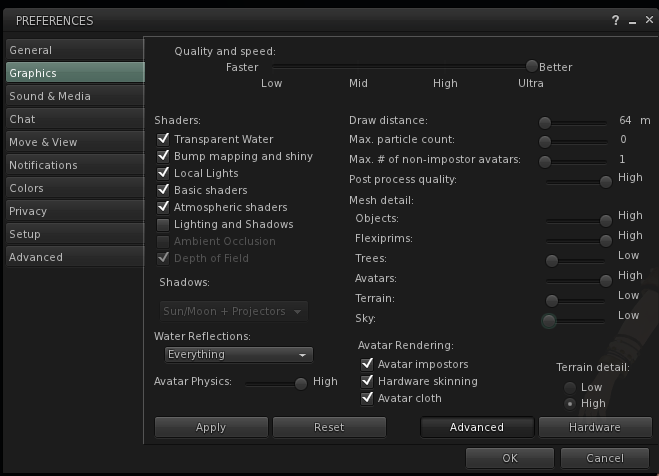
Now I move on to setting up preferences. I do a lot of things that other folks don’t do. I disable chat and im logs and turn off notices of when people log in and when money is spent or received. I would rather check to see who is logged in when I am done snapping pictures than get an announcement every time someone logs on or off. It may be antisocial, but all those notices make me antisocial. I am only going to focus on setting up the graphic preferences and remind you that I change them all the time. I run around SL with the default graphic setting on Medium and then if I am shooting in the studio, I will turn the terrain, sky, trees and distance as low as possible. I don’t need them and so I turn them down. When I shoot in-world I crank them up and crank up the draw distance as well, so I get the lovely clouds in the sky. As you can see, I don’t have lighting and shadows selected. I only select them if I think there is a reason for it – if it adds to the composition somehow.
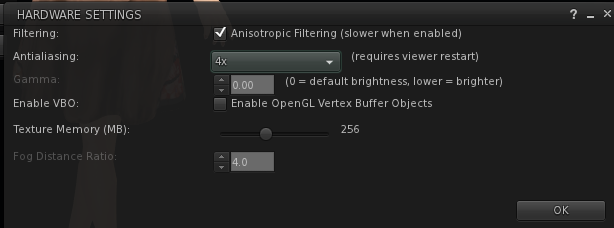
A critical step in setting up preferences is enabling anti-aliasing and setting it to 4x or higher. I leave anti-aliasing on all the time because you have restart SL to turn it on and off. That’s no fun. Anti-aliasing is what gets rid of most of those jagged edges on your photos. I also check Anistropic Filtering to get sharper textures, but deselect it when I am shopping, exploring and running around. Now, some of you can access your graphic cards control panel and set preferences there – outside of the SL viewer – and can then disable them in SL for a faster, more stable experience. You can read how to do that at Dancien Grave’s tutorial at Shopping Cart Disco. If you are doing shadows, there is sometimes a conflict with anti-aliasing and you will want to turn it off. Just remember that you have to restart.
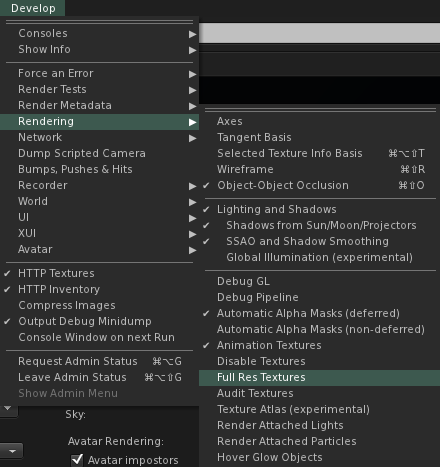 I will save my own thoughts on enabling Lights and Shadows for another day, but will pass along one useful bit of info for those who are using shadows. Sometimes when you check Light and Shadows in your Graphic Preferences, you get jagged edged shadows that just look weird. If that happens, go to your Develop menu and under Rendering, make sure that SSAO and Shadow Smoothing is checked. For some mysterious reason, sometimes it is automatically checked when you opt for Lighting and Shadows and sometimes it is not. Random weirdness is not normal computer behavior, so I am sure there’s some explanation, but I am not obsessive enough to hunt it down in the wikis and blogs.
That’s pretty much what I do to set up. This is all preparation for shooting photos of course and I will do another tip sheet on taking photos and on windlight soon, but this is already long enough to be just slight crazy.


I am not afraid of long articles — having written a few (dozen) in my time myself. Thanks much.
Pingback: Friends Don’t Let Friends Take Bad Snapshots « the messenger
Pingback: Shopping Cart Disco - Second Life's #1 Fashion and Gossip Rag
I had no idea about all the camera angle ‘freeing’ you could do (after more than four years in SL, oops). Thanks for being so generous with your knowledge — I know it’ll help me measurably.
You’re very welcome. I can’t wait to see what you do, because your photos are already amazing.
You made me roar with laughter when I set the FocusOffset Front and Rear views without testing. Suddenly I was staring at the domed roof of the sim I was in and wondering what I’d done! (I’ll be keeping that setting for shopping though when the goodies are 40 million miles high in unnaturally tall buildings.)
But seriously, even disabling camera constraints has made a huge difference in some test shots so I can now tilt from the water level at a more acute angle — thank you *hugs*.
maybe you plussed in place of a minus? You get the best result for your avatar just running up and down the numbers to what’s perfect for you. I am glad, though, that it’s useful for you.
well i know this old but im just now seeing this now its time to see what it look like